
LINKS TO MORE PHOTOGRAPHY SITES AND PHOTOGRAPHIC INFORMATION
These ads help to defray the cost for hosting ONLINEPHOTOGRAPHY
PHOTOGRAPHIC PRODUCT QUICK-REVIEWS
This article will review various photography related products. Each review is hands-on,
I.E. we own and use these things. No holds barred here; if something's good,
we'll let you know. If something's bad, we'll tell you.
TABLE OF CONTENTS
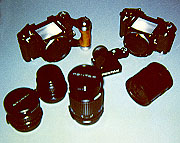
PENTAX 6X7 CAMERA SYSTEM
PRODUCT INFORMATION
Price, Body: US$999.95
Price, 105mm lens: US$469.95
Price, 45mm lens: US$899.95
Price, 200mm lens: US$789.95
Price, meter prism: US$439.95
Prices quoted from B&H Photo catalog, January 1997. No endorsement for B&H Photo is implied.
Product Review by the EDITORS
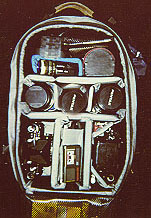
I've been using the Pentax 6X7 for over 3 years. I have 2 bodies, one for color and one for B&W. I also have the prism-meter viewfinder, and the 45mm, 105mm, and
200mm lenses, along with a set of extension tubes. This may seem like a lot of stuff, but I use it all. Everything fits in a Tamrac backpack, which weighs in at 22 pounds.
I have tried to reduce the weight of this thing, but I can't seem to get below 22 pounds. If I leave out one single item, that will, of course, be the one item I'll need when
shooting in the middle of a forest.
 I suppose that my concentration on the weight leads to the ONLY negative factor with the 6X7. This camera weighs a lot. The prism alone has a remarkable heft.
But this weight is a result of a camera that is built like a battleship. I think that I will probably have it for the rest of my life, and it will probably NEVER need repair service.
I suppose that my concentration on the weight leads to the ONLY negative factor with the 6X7. This camera weighs a lot. The prism alone has a remarkable heft.
But this weight is a result of a camera that is built like a battleship. I think that I will probably have it for the rest of my life, and it will probably NEVER need repair service.
The quality of construction is first-rate. Every control feels solid, and there is absolutely no play in any of the dials. All of the markings are very clear and easy to read.
The lenses are very easy to mount. Many is the time that I've been working in the rain, and I was able to make lens changes with only one hand.
The 6X7 has been described as "a 35mm camera on steroids". This is true, but it is a good thing. If you have always used 35mm cameras, you will feel right at home
the moment that you pick up the 6X7. It IS a 35mm camera, just bigger and heavier. All of the controls are in the same relative positions as on a regular 35mm. In fact,
with the addition of the hand grip, it is a pleasure to run around hand-holding this camera and taking medium format pics. And the looks you get from people: they can't
figure out what you've got!
With the quick and easy removal of the metering prism, one is presented with a ground-glass viewing screen. This screen can be used for actual size layouts. It is
possible to write on the glass with a grease pencil to mark layouts in the composition. A magnifying loupe can be used to magnify critical elements in the scene.
If considering buying a used body, make sure that it has the mirror lockup feature. The mirror in this camera is huge, and when you push the shutter button, the
movement of this mirror will shake the camera. Mirror lockup will allow you to move the mirror out of the light path BEFORE the shutter is tripped. Older 6X7's do not
have this feature.
Some minor problems: it is sometimes difficult to insert or remove the film spools, and the camera is very loud when the shutter is tripped.
There is no automation on this camera...take a meter reading, set the aperture and shutter speeds, and take the picture...that's it. If you need automation, this is NOT the
camera for you. But if you like simplicity and complete control (and no buttons!!) then the 6X7 is a winner.
RETURN TO PRODUCT REVIEW TABLE OF CONTENTS
RETURN TO ONLINE PHOTOGRAPHY HOME PAGE
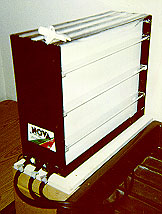
NOVA TRIMATE VERTICAL PROCESSOR
PRODUCT INFORMATION
Price, 16x20: US$783.90
Prices quoted from B&H Photo catalog, January 1997. No endorsement for B&H Photo is implied.
Product Review by the EDITORS
For years, I have been processing my color prints in inexpensive rotary tube processors. My results have always been good. But the time required to process each print (even though the in-chemical process time was only 3 minutes) was getting bothersome. Not only did one have to pour chemicals into and out of the tubes, but the tubes themselves had to be washed and dried after each print. Having a number of tubes and an automatic dryer did not help. What to do?
After much careful thought, I settled on the purchase of the 16X20 Trimate processor made by NOVA. This unit consists of three vertical slots, each about 1 inch wide, into which the chemicals are placed. The exposed print is then placed in the proper slot, agitated for the proper amount of time, and then moved to the next slot. When I first started to use this system, I was concerned about the effort required to do all of this in the dark, but by the time I was on my third print, all fears were gone. This processor could not be easier to use.
Setup consists of filling the space between the slots with water, filling the slots with chemicals (for RA-4, they are: developer, stop bath, bleach-fix) and turning on the internal heaters. After about 1 hour, the chemicals had reached the operating temperature of 34 C and the unit was ready to go. Using the supplied print clip, an exposed piece of paper is lowered into the developer and agitated for 45 seconds. It is then pulled out, allowed to drain for a few seconds, and then slipped into the stop bath, where it receives a 15 second soak. Then into the bleach-fix (at which point the room lights can be turned on), and finally into the wash. Total time: a bit less than 2 minutes and I can begin the next print IMMEDIATELY.
This machine is fast, small, and VERY easy to use. Nova supplies short lengths of pipe that are laid across the top opening of the slots to prevent oxidation when the processor is not in use. The instructions claim a useful chemical life of 6 months when so sealed. I have not had the unit that long, but the chemicals currently in it are 30 days old, so we shall see what happens.
The only problem I have had with the unit is that I had to set the temperature control knob to 44C to get a working temperature of 34C. But the unit seems to hold the 34C quite accurately.
Replenishment is a snap. I have determined that opening the slot drain for 2 seconds bleeds off the correct amount of chemical. I can then replace the drained chemical with the proper amount of fresh chemical.
At a cost significantly less than a higher-end rotary processor, this unit is a quick and easy solution to making high-quality color prints.
The series is available in sizes from 8 X 10 to 16 X 20, in two slot (CLUBMATES) and three slot (TRIMATES) versions. Also available
are vertical print washers that attach to the processor.
RETURN TO PRODUCT REVIEW TABLE OF CONTENTS
RETURN TO ONLINE PHOTOGRAPHY HOME PAGE

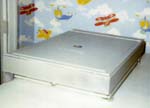
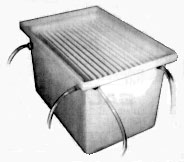
NOVA PROMASTER ARCHIVAL WASHER
PRODUCT INFORMATION
Price, 12x16: US$357.95
Price, 16x20: US$449.95
Prices quoted from B&H Photo catalog, January 1997. No endorsement for B&H Photo is implied.
Product Review by the EDITORS
OK, now that I'm making prints for sale, I think that its time to get a professional print washer. No longer can I afford to shove prints into a 20 X 24 tray and swish the prints every 15 minutes for a total of two hours, and have an occasional overflow that makes a mess of the darkroom floor. Enough is enough.
My purchase of a NOVA Archival Washer has eliminated most of my frustration. Now I can put prints into the washer and go do something else. In an hour, out they come. And no spills (all I have to worry about are earthquakes: a big enough one will send the 200 lbs of water all over the place, and that would be a disaster).
Hookup is very easy: inlet tubing to a faucet (an adapter is included) and the outlet tubing into a sink or drain. I would recommend (and have installed) a check valve on the input line to prevent the tank from draining back into the water system or out through another faucet on the same water supply line.
I run the drain water into a tray in my sink, so that the tray is always filled with water from the tank. This tray becomes my holding tank, and all prints pass through it on the way to the washer. Probably 90% of the fixer on the print is removed in this pre-rinse. I then place the print in the left-most washer-slot (there are 12 usable slots) for about 5 minutes, then transfer it to the right-most empty slot for a one hour wash.
The unit is very easy to use, but it has a number of peculiarities that I consider to be rather bothersome. These are as follows:
- The slot dividers are warped. Therefore, each slot has a rather pronounced curve. The last (13th) slot is so warped that it is not usable.
- The plumbing connections are on the end of the unit, and they protrude 2 or 3 inches. By the time tubing is added, even with right-angle adapters, these things stick out about 5 inches. One of these days, I'm going to bump into them when I'm walking by the tank, and something will break.
- The prints sink to the bottom of the tank and the face of the print is in serious contact with the slot divider. I find myself jogging each print in its slot with the plastic stick provided by Nova for this purpose. Using a print clip for each print would solve this problem, but they are expensive, and sometimes I will have 25 8 X 10's washing at the same time. Increasing the water flow rate does not solve this problem.
- It is almost impossible to drain all of the water from the unit. If a long period of time will pass between uses, it probably would be a good idea to turn the unit upside down to drain it completely.
I do not know if other washers exhibit similar problems. If you are shopping for a washer, I would consider all of the brands available and carefully look at them for their particular quarks. In general, I am satisfied with the Nova, but my needs are minimal. If I was a professional making many prints everyday, I would not be happy.
RETURN TO PRODUCT REVIEW TABLE OF CONTENTS
RETURN TO ONLINE PHOTOGRAPHY HOME PAGE
HEWLETT-PACKARD 4C FLATBED SCANNER
PRODUCT INFORMATION
Price, US$798.95
Prices quoted from local Southern California retail stores.
Product Review by the EDITORS
There are MANY flatbed scanners now on the market, some of them costing as little as $200.00 for a 300dpi color unit. This was not so when I bought the H-P. At that time (late 1995) the bottom-of-the-line color, single-pass scanner was $500.00. No surprise....things change rapidly! I cannot comment on any scanner in specific terms other than the H-P, for this is the only one I have extensive experience with.
The H-P was not the first scanner I purchased. That honor (?) belonged to a Mustek unit. I was never able to get the Mustek to work at all, even with technical help and a replacement driver card. After 4 weeks, I finally gave up, returned the Mustek, and purchased the H-P. I did so with the hope that the H-P name would guarantee a trouble-free installation and a quality product. I was correct on both counts.
The 4C has an optical resolution of 600 X 600 dpi, with interpolation allowing up to 2400 dpi. It is heavy and is well constructed. It is also large since it can handle 8.5 X 14 inch documents. It comes bundled with Visonneer Paperport (which is a VERY useful software package) and OCR software. Everything works quite well, and the OCR package is quite accurate.
The 4C (as can most scanners) can be run either through its own software or through any Twain compliant software package. The 4C's software includes several tools for manipulating the scanned image (high point and low point, color balance, emphasis) and these work well, but I usually just scan the picture, maybe touch up the contrast a bit, crop it, and then do all of the other stuff in Photoshop. Even though the preview in Deskscan (the name of the 4C's software) is adequate, Photoshop provides a much more versatile display, as should be expected.
The 4C even sounds good! Its scans are smooth and even, with a low whirring sound. Some scanners I've heard sound like an old jalopy with shredded iron in the transmission. This does not necessarily reflect on image quality, but it can get on the nerves after a while. (The H-P sounds so good, in fact, that it comes with several programs that make it sing. Yes, that's right, it sings. I've heard it do Bicycle Built for Two!).
In conclusion, if you want an excellent scanner, from a company with an excellent reputation, the H-P is a good choice. And now the have increased the selection with several lower priced models. I wonder if they can sing too?
RETURN TO PRODUCT REVIEW TABLE OF CONTENTS
RETURN TO ONLINE PHOTOGRAPHY HOME PAGE
VERSALAB ARCHIVAL WASHER
PRODUCT INFORMATION
Price, US$190 (11 x 14), US$290 (16 x 20)
Product Review by Dave Karp
One of the problems facing amateur photographers is the great expense
of some of the available accessories. I ran into this problem when I
decided to use primarily fiber base rather than RC paper. This required a
better print washing system than the one I have been using. Investigating
the options quickly demonstrated the high cost of most of the print washers
on the
market. I was getting ready to try to build my own, despite the fear that
it would take quite an investment before I arrived at an archival quality
solution, when Versalab came to my rescue.
The Versalab Archival Print Washer comes in two sizes: 11 x 14 ($190)
and 16 x 20 ($290). The price being quite a bit less than all of the other
high quality washers, I decided to give the 11 x 14 version a try.
The washer comes disassembled. The largest piece is a large opaque
white rectangular tub. The user connects the input hose, the spray tube,
two drain hoses, the syphon hose, and the print basket. Parts are primarily
plastic and stainless steel, with PVC hose. The instructions are clear, and
the washer is fairly easy to assemble.
The washer is large, so I put it in the bath tub. An extension input
hose fashioned from drinking water tube connects to the washer's input hose
brings water from the nearby sink. The input rate is determined by
listening to the sound created by a break hole in the syphon tube.
According to the instructions, you can achieve the proper flow by adjusting
the input until you hear a soft buzzing or purring sound. The sound is
readily apparent. If the input is too fast, two
overflow tubes near the rim of the washer allow water to flow out. Water is
drained by sliding a grommet over the break hole, and turning off the input
water. The tank will drain almost to the bottom, and is then easily tipped
to dump the last of the water.
Prints are held in a basket with fourteen slots. The instructions say
that the basket holds two 11 x 14 prints (back to back) or four 8 x 10
prints per slot, when the prints are placed back to back. I have not yet
had to try the back to back arrangement. The slots are wide and it is easy
to insert and remove the prints.
I have washed prints following the instructions with the processor and
also the
instructions for use with Heico Perma Wash. Results were tested with
Photographer's Formulary Residual Hypo Test, and passed both times. My
normal wash is somewhat longer, to be safe.
The Versalab washer is available via mail order. They advertise in
Photo Techniques Magazine. Their telephone number is 970-622-0240.
RETURN TO PRODUCT REVIEW TABLE OF CONTENTS
RETURN TO ONLINE PHOTOGRAPHY HOME PAGE

COKIN FILTER SYSTEM
Product Review by the EDITORS
One of the biggest problems that I have encountered when using filters is the confusion that results when I have 3 lenses, all requiring different filter sizes, and a bag full of filters. What I would normally do is buy the filters for the largest lens, and then have adapters to allow these filters to fit on the smaller lens. This works well. The only problem is that the filters for my largest lens cost a FORTUNE (I shoot 6 x 7). I have found the solution in the Cokin series of filters. Simple, clever, inexpensive, with just about every filter imaginable available.
The system consists of 3 parts: the square filters, the filter holder, and the adapter rings. I’ll discuss each in turn.
The square filters are available in two sizes, either 3 x 3 inches (for 35mm) or 4 x 4 inches (for medium format). I have the larger size, which allows proper coverage for medium format lenses, but also allows me to use the same filters when I shoot 35mm. Most filters are made of plastic, with certain exceptions, I.E. polarizers are round and are made of glass. Every imaginable color filter and special effect filter is available. In fact, the Cokin catalog looks like a small paperback book. It also shows the before and after affect of each filter, a very useful feature.
The filter holder is a clever device that slips over the adapter on the front of each lens. Installation time is one second and the holder can be left on even when no filters are in place. In fact, each holder comes with a slide-in lens cap so that each lens could have a permanent holder, if such is desired. The advantage to this: zero installation time....you are always ready to go. When you have decided on a filter to use, just slip it into the holder. You can use up to 3 flat filters at a time, or 1 round filter and 2 flat filters simultaneously. I feel that the largest advantage of this system is the ability to rotate the square filters (the entire holder rotates) while adjusting the up and down orientation of the filter. This is particularly important when using split filters.
The adapters allow, the holders to mount to the front of the lenses. They screw onto the lenses as a normal round filter would, but the are left on permanently. The filter holder then quickly slides on to this adapter. The adapters are very inexpensive and are made of lightweight aluminum.
Cokin also makes a snap on lens shade that snaps onto the front of the filter holder while the filters are in place. So the holder becomes a nexus for all of this useful stuff in front of the lens.
The only disadvantage I have encountered with this system is a bit of vignetting when using wide angle lenses. The filter holder does extend out about 1/2 inch in front of the lens. I usually solve this problem by making sure the holder’s slots are aligned with the longer sides of the negative. Of course, this won’t work with square formats. But overall, this has not been a serious problem.
RETURN TO PRODUCT REVIEW TABLE OF CONTENTS
RETURN TO ONLINE PHOTOGRAPHY HOME PAGE

NOVA MAXILUX SAFELIGHT
Product Review by the EDITORS
I have recently begun doing color work in the NOVA verticle slot processor (see review elsewhere on this page). Previously, I had used processing tubes, which had to be loaded in the dark, but once the tube was closed, the remainder of the process could be carried out with the lights on. I am used to working with at least some light, having grown up with B&W. So I was a bit uncomfortable having to work with the verticle processor in the dark until the print was blixed. (I’m not really complaining, for the entire process took but a few minutes. I just like having a bit of light). So when I saw the advertisement for the COLOR SAFELIGHT, you can bet that I went out and bought one.
We’ll, what did I get? The unit consists of an LED (light emitting diode) light source, in front of which is a rotating filter. Three filters are selectable: one for B&W paper, one for color-negative paper (RA-4), and one for color-slide paper (R-3). I have only used the filter for color-negative paper.
The instructions give the procedure for determining the “safe” exposure time, in seconds, of the paper to the safelight. This immediately raised my eyebrows. I was under the impression that this would be just like a B&W safelight....if placed far enough away from the paper, I would get many minutes of safelight time. The instructions, however, were talking about seconds. So, I worked through the procedure and found that, with the safelight 10 feet from the paper, I had a safetime of about 30 seconds. (After this safetime, there was a noticeable change in the quality of the image). I have thus assumed that my ACTUALLY safe time is more on the order of 15 or 20 seconds. This is NOT enough time to process a print. I was quite disappointed.
But wait, this isn’t as bad as it seems. I have developed a procedure that allows me to use the safelight AND not be stuck in the dark. Here’s how I do it: I expose the paper in the dark. Then, using a footswitch, I turn on the safelight and at the same time slip the exposed print into the first (developer) processing slot in the NOVA processor. Development time is only 45 seconds, during which time I have turned off the safelight. I then turn it back on to transfer the print to the stop bath, then off, then on to transfer to the blix, and then I turn on the room light. So I have a bit of illumination when I transfer the print between slots, when it is really needed. Recently, I have just left the safelight on after the print was in the developer; its probably pretty dark down in the slot, and the print would only be exposed when it is being transferred, a process whose total time is less than 15 seconds. This seems to work, and I will use this method. But I still have the footswitch nearby in case I have trouble with the paper and the seconds are ticking away.
In general, I am satisfied with this product...I was just surprised by the limited time of use factor. This was surprise was probably due to my own lack of cognitive thought. After all, Kodak recommends that NO safelight at all be used with RA-4. I think that the MAXILUX is a good compromise and is quite useful.
RETURN TO PRODUCT REVIEW TABLE OF CONTENTS
RETURN TO ON-LINE PHOTOGRAPHY HOME PAGE
ARTICLE SURVEY